Sunday 23 December 2012

Christmas Nail Art

Today, another quick post for you on some Christmas nail art I did. I don't celebrate Christmas as some of you know but when everyone is doing Christmas mani's it is hard not to get a little inspired and some of nail art I've seen is awesome. 

Mine is pretty simple, all I used is a striper brush and some striping tape to get the neat lines for the Candy cane inspired fingers. 

Lets take a look at the pictures...


Polishes I used:
Duri Rejuvacote
Barry M Matte White
Nails Inc Villiers Street
Nails Inc Emerald Street
Wet n Wild Kaliedascope 
Seche Vite


I hope you like what I did, and I hope you have a very Merry Christmas to those of you who celebrate it! 
Thanks for reading! 

Wednesday 19 December 2012

Polka Dots and Bows

Today I have a quick post showing you some nail art I did using polka dots and bows. I did these at 3am when I couldn't sleep but man did they turn out really cute!!

 I used a dotting tool for the polka dots and a thin nail art brush for the bows. I put on the rhinestones by using a dotting tool and some clear topcoat. 

Lets look at some pictures!!


And I had to share the latest addition to out household, my cute kitty Draco!! 


Thanks for reading!! 


Nails Inc Paddington Street and gLORious 22K Goldleaf Topcoat


Today I have a lovely vampy red from Nails Inc. who makes some amazing crèmes. Like literally most of their crème polishes are one-coaters. Paddington Street’s formula is great but I had to do two coats of this to get it to look as it does in the picture. That’s because I applied this in thin coats to avoid flooding my cuticles and ending up with what looks like a massacre.

Let’s take a look at Nails Inc Paddington Street on its own.


Then I decided I was going to try a goldleaf topcoat which is all the craze at the moment with brands such as OPI, China Glaze, Zoya making them along with some Indie brands. The amount of choice you have his immense. Prices for these from are way too high for my budget but I really wanted to get one of these. Some of you may remember Lori who sells the Spectraflair (holo powder) that I used in this post. Her brand gLORIous sells not only Spectraflair but also topcoats. These include the goldleaf topcoat so I brought it in a flash! Especially seeing as it was nearly half of what it would cost me to get OPI Man with the Golden Gun.

Here’s what it looked like on top of Paddington Street …


It took me two coats to get this effect. When I first took the brush out it had nothing on it and I was disappointed but the second time I tried I got the flakes on my brush without having to fish around, so that was a huge relief. Must’ve just been bad luck the first time coz ever since then I’ve always has some flakes on my brush. I love how it looks and makes me feel so pretty wearing gold on my fingertips!!

I also tried this over Nails Inc. Baker Street and absolutely loved it. Sorry, only a mobile phone pic but you should get to see how lovely it looks.


gLORIous products are available from Lori from her store HERE. Check it out!
Thanks for reading!!


Thursday 29 November 2012

Illamasqua Ruffian Nail Art

 Yesterdays posts wearing Illamasqua Muse made me want to take out some of my other Illamasqua polishes. So today I'm wearing not one but two Illamasqua polishes. 

I always wanted to try doing a ruffian manicure. For those of you who don't know what a 'ruffian' is, its kind of like a reverse french tip. I'm not sure how else to explain it so its best you take a look at the pictures..


Polishes I used:
Nail Envy Soft and Thin
Illamasqua Propaganda 
Illamasqua Snap
Seche Vite

I also used clear rhinestones for added bling.

I started off with 2 coats of Illamasqua Propaganda, a deep navy blue coloured jelly polish. I then put on one coat on Illamasqua Snap, a pewter polish with a shimmer, making sure to leave a gap at the base of my nail to show Propaganda. To finsih it off I put 2 clear rhinestones at the base of my nail using a dotting tool and some topcoat. I sealed it all in with a final layer of Seche Vite, my go to fast drying topcoat. 

I had some shrinkage from the topcoat and you can see some of Propaganda showing through on the tips, probably because I forgot to wrap my nails. *Doh!*
I ideally I would have preferred it if I left a bit more of a gap so that more of Propaganda was showing but that something I can live with. Overall, I love how this turned out! 

Thanks for reading!!

Wednesday 28 November 2012

Jade Hypnose


In my earlier post you saw me post Illamasqua Muse. Well whilst I was wearing that I got some nail mail which had the fabulous polish Jade Hypnose in it. Obviously I couldn't wait to try it out and I was wearing the most perfect underwear polish which meant I didn't have to wear to many layers of Hypnose.

Here is one coat of Jade Hypnose over one coat of Illamasqua Muse.  There is no sun at all here in Birmingham UK so all my picture are with a flash so you can see the lovely holo-ness!


Polishes I used:
OPI Nail Envy Soft and Thin
Illamasqua Muse
Jade Hypnose
Seche Vite

This is way more holo in real life, my camera just could capture its awesomeness.

 Jade is a Brazilian nail polish brand and does amazing holographic and duochrome polishes. This is the first Jade I have but I have some more on my wishlist and hope to get them soon.  Jade Hypnose is a linear holographic polish from the Holografico collection along with loads of other beautiful colours. Application was really smooth and again I really loved the brush size on these.

I couldn't help tamper with it so I ended up stamping over it using Kleancolor Metallic Black and MASH plat m20.


I brought my Jade polishes from a blog sale but you can buy them from the lovely ladies at Ninja Polish for $8 plus shipping and they ship internationally which not many places do.

Thanks for reading!!

Illamasqua Muse


I rarely do swatches of colours on their own as I find it hard not to want to spice things up and add some sort of nail art on top of it. But today I put on Illamasqua Muse and my gosh is it lovely, so lovely that I had to show you it.

It is a teal coloured crème polish, which is opaque in just one, yes ONE, coat! I used just one coat for the pictures below.


Fingerprints!! :O


Polishes I used:
OPI Nail Envy Soft and Thin
Illamasqua Muse

I love Illamasqua polishes; there brushes (along with China Glaze) are just the right size for me and make applying polish neatly easy. Some people prefer thick brushes such as OPI or Sally Hansen Insta-Dri but I prefer the thinner brushes.

The formula of this polish is great and applied like butter. I applied one coat and let it air dry and I have to say the dry time is pretty good, it was touch dry within 5 minutes with no smudges.

I love this polish and I love this brand. They are pricey at £13.50 a bottle but they are worth it. They also have some good sales on their website with some going for as little as £5, which if you ask me is an absolute steal!! So it is best to be subscribed to their newsletter to know when they are having a sale.

This has definitely made me want to try out my other Illamasqua polishes, expect some more swatches of their polishes from me soon.

Thanks for reading!!

Tuesday 27 November 2012

Nail Art: Vintage Photo Film Negatives

Today's nail art is inspired by those old film negatives you used to get before everyone got into digital cameras. I actually started this manicure going for another look then this came to mind so I did this instead. 

I only have one decent picture of it, but I think it does a decent job of showing off the mani.

Lets take a look...


Polishes I used:
OPI Nail Envy Soft and Thin
China Glaze Liquid Leather
Barry M Grey
Barry M Matte White
Seche Vite

I also used a medium length striper brush and short thin nail art brush. 

Not my neatest nail art, and it took me a while to figure out the best way to do this quickly and precisely, I think next time I try this it will be much easier and look a little neater. 

I used the striper brush to make a thick grey line (Barry M Grey and Matte white mixed together) in the middle of my accent nails and 2 very thin ones on either side of it. I then used the same striper brush to make the black lines going across the thick grey stripe in the middle. Using the smaller brush I made the line across the 2 thin grey stripes on either side. 

I'm not very good at explaining but I hope you understood what I did.  :-D

Thanks for reading!!

Wednesday 21 November 2012

WnW Ready To Pounce: Stamping and Polish Jewellery!


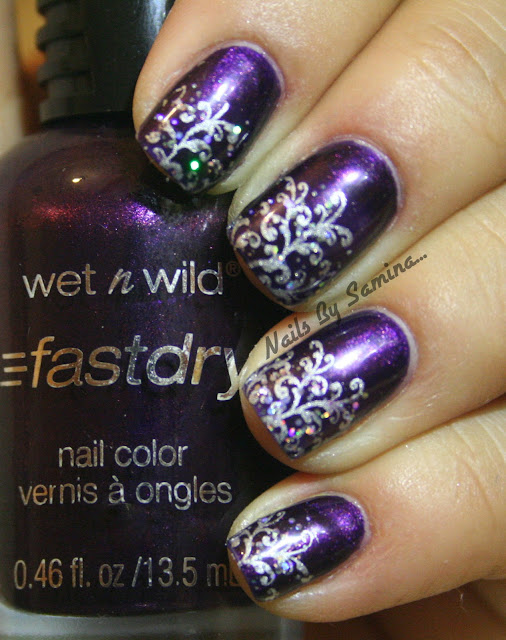
Today I have a polish from Wet n Wilds On The Prowl collection from Autumn 2011 collection had loads of pretty colours, but for this post I have Ready To Pounce, a deep aubergine colour with a lovely shimmer and ever so slightly duochrome.

I first tried this mani out as not a mani but on a cabochon for a necklace I made as gift for my friend’s birthday. I loved it sooooo   much as a necklace I had to put it on my fingertips!!

Let have a look at the pictures…

 Ready to Pounce before stamping


Polishes I used:
Essie 3in1 Base
WnW Ready To Pounce
Barry M Silver Foil Effects (used for stamping)
WnW Kaleidoscope
Seche Vite
I also used Bundle monsters BM 225 plate.

I applied 2 coats of Ready To Pounce and I topped it with a topcoat to help with drying. Once the polish was completely dry I used the Barry M Foil Effects to stamp the image on the tips of the nails. I only needed to use half of the image. Finally I added a thin coat of WnW Kaleidoscope (holographic round silver glitter in 2 sizes in a clear polish) on top of where I had stamped the image and topped it all off with a coat of topcoat.

This is my favourite nail polish jewellery that I have made so far! It’s something I’m really enjoying doing at the moment!


To make the same design on my cabochon I had to do what I did on my nails but in reverse order.  What do you think of my polish jewellery?? Pretty neat huh?

Thanks for reading!


Saturday 17 November 2012

Barry M Green Sparkle Magnetic


Today I’m going to show you a magnetic by Barry M! I've not really gotten that into the magnetic nails polishes but whilst shopping in my local Superdrug for a swap I saw a new addition and this time it had holographic micro glitter in it! That’s right I said holographic micro glitter!

So of course in my basket it went! And of course as always it gets lost in all the untried polishes I have. Compared to a lot of girls my collection is only tiny but damn do I still have a lot of untried polishes.

Anyways enough of me babbling let’s have a look at the pictures I took.


Polishes I used:
Essie 3in1 Base
Barry M Green Sparkle Magnetic

I used 2 coats for the pictures. I first applied a thin coat without magnetizing it. Then I applied another slightly thicker coat (so it doesn't dry before I have a chance to magnetize it) and then hovered the magnet (which is in the cap) over my nail for about 20 seconds, making sure the magnet doesn't touch the polish on my nail) to make sure the pattern came out and stayed out. Sometimes I find that if you don’t hold the magnet long enough the pattern fades a little. I let this air dry and you can see some slight bumps on the nail from where the glitter is, a coat of topcoat will sort this out as the bumps are not so bad, I was just being super lazy as usual!

I love how this looks and have to say I’m a little bit in love with this polish! I hear there are some other colours like this and I’m going to be looking out for them when I hit the shops next!

Barry M polishes can be purchased in the UK Boots and Superdrug, the magnetic line is retailed at £4.99 each.  If you’re an international polish addict you can get your hands on Barry M at Ninja Polish's online store!

Thanks for reading! 

Wednesday 14 November 2012

Diabetes Awareness: Manglaze Royal Matterimoaning!

Today post is dedicated to World Diabetes Day. I am supporting this cause because I am a student nurse and I've seen the effects of diabetes on a person’s daily life but I also know how it can be life threatening. So by raising awareness of what diabetes is can effectively save a life.

To help support World Diabetes Day nail polish bloggers and just anyone who loves polish are painting their nails blue. 
As my blue mani I am going to be showing you a polish that I have been wanting to try out a long time by its been sitting untried in my helmer. Today I am going to show you Manglaze Royal Matterimoaning! 


This is a royal blue matte finish polish. The polish has a shimmer to it that all Manglaze polishes have. The formula was great to work with, and I would say the easiest application of any of the matte polishes I've used. 

I used 2 coats for these pictures with no base coat and no topcoat. I didn't use a basecoat because sometimes when using matte polishes a basecoat can cause dragging. 

Thanks for reading!!


Tuesday 13 November 2012

Eid Manis!!

Some of you may know that Eid has just recently passed. For those of you who didn't know or don't know what Eid is , I wont go into detail here but there are 2 different types of Eid. there is Eid-ul-Fitr and Eid-ul-Ada (but we just call them Small Eid and Big Eid) you can types those in a search engine and find out what each of them are.

 Eid is kind of like Christmas I guess, the reasons for each celebration differ but on Eid we all get dressed up wearing new clothes and make loads of scrumptious food and go visit family and friends.Which is kinda like Christmas right?

Obviously I can't get dressed up for Eid without having a mani to.compliment my outfit! There are 3 days of celebrating but I'm only going to.show you my manis for the first 2 days. I tried to find decent pictures of my outfits as well but unfortunately I couldnt find a good one for day 2. 
on to the pictures!!


Day 1:


My outfit for the day! (and yes that is my phone and yes it's HUGE! lol)
Please excuse my messy room!


Polishes I used:
Essie 3in1 Base
Zoya Mitzi
Milani Neon Fresh Teal
OPI I’m In-dia Mood For Pink
Black Striper Nail Art Pen/Brush from eBay
Seche Vite

I also used a medium length striper brush which I also brought from eBay.

I really love how all these colours go together! I don’t usually go for bright manis but I really loved this! Zoya Mitzi is a matte polish but I decided to add topcoat to it so it would be nice and shiny like the other nails. 

Day 2:


My outfit for the day! I totally forgot to take one standing up so you get one of me sitting! :)
P.S. Look at my henna!!

Polishes I used:
Essie 3in1 Base
China Glaze Fifth Avenue
Zoya Moxie
Seche Vite

I used Red Angel stamping plate in RA 112.

I tried to match my nails with the velvet on my sleeves and I think it worked pretty well! I did mattify this later on with a matte topcoat and it looked awesome but I didn’t get a chance to take a picture. Maybe I will do a similar mani again and make sure to take pictures of it matte so you can see what I mean.

Thanks for reading! 
Thursday 18 October 2012

Stamping Black and Pink Roses


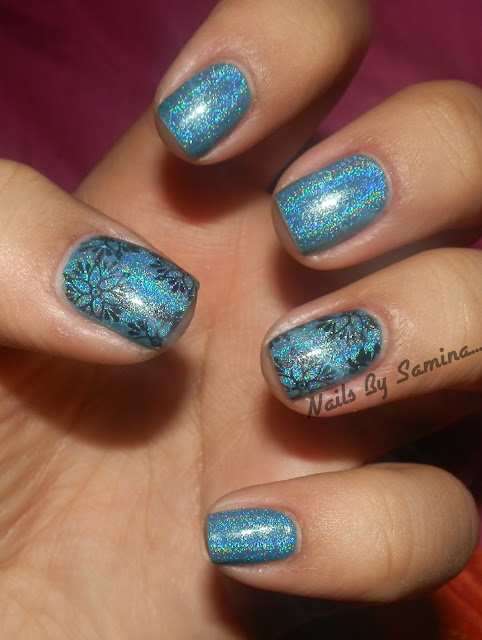
Today I have some more nail art to show you, and more roses at that too!!  This time I did some stamping. It is not my neatest stamping, I did these in a hurry and the topcoat smudged the black roses a little. But I'm still happy with the over all effect.

On to the pictures...


The second picture is not very colour accurate for the pink roses, my camera decided to make it more neon than it is.

I used one image of the rose and stamped 3-4 time alternating between the black and pink on each nail. I stamped all the black roses first, cleaned my stamping plate and then stamped all the pink roses. 


Polishes I used:
Essie 3in1 Base
Barry M Matte White (2 coats)
Barry M Black
Barry M Fushia
Seche Vite

Stamping Plate I used:
Red Angel RA 116

So what do you think? 


Wednesday 17 October 2012

Color Club Revvolution Spectraflaired!! (and matching polish jewellery!!)

Today's post I'm going to show you CC Revvvolution. I have been trying to get a hold of the original of this for a long time now, each time I've brought this it always been a dud (not holo). I've finally given up hope so I though I would add some spectraflair to my bottle to make it holographic.

For those of you who don't know spectraflair comes in powder form and is usually used on cars but can be added to polish to make said polish holographic. It usually lightens/dulls the polish but I didn't see any change in Revvvolution at all. Spectraflair isn't so easy to come by but you can get it from my friend Lori who sells it HERE.

I also decided to make a ring to match this mani as I love it so much!!
Lets take a look at the pictures!!

With Flash

Close-up of Ring

No Flash

With Flash 
No Flash

With Flash
I love how opaque Revvvolution is!! I only used one coat!! Application was really smooth too, I just love this polish!

Polishes I used:
Essie 3in1 Base
Color Club Revvvolution  Spectraflaired
Seche Vite

Polishes I used to make the ring:
China Glaze Fairy Dust
Orly Shine On Crazy Diamond
Color Club Revvvolution Spectraflaired

It is more of a scattered holographic effect than linear. The polish looks grey in the bottle and on the nail without the flash but with the flash it looks more black, the same can be said for the ring too. 

The ring setting is gorgeous!! My sister brought the ring setting from eBay and I can't find the link, sorry guys!! 

So what do you think of the polish and the jewellery? Are you going to buy some spectraflair? If so let me know how you will use yours!!

Tuesday 16 October 2012

Teal and Nude Stripes

Today's mani came from me attempting to bring together an outfit. I wanted to wear a teal scarf but I also wanted to wear my tan blazer. They seemed a little ill matched so I thought 'I know! I'll do a some nail art to bring them together!'.

 So this is what I came up with...

Without Flash; More Colour Accurate Than With The Flash

With Flash


With Flash

The flash is really strong and brings out the teal a lot more than it did in real life. The colours seem to go and you also cant see the shimmer from Cuckoo For This Color as much in real life as well. 


I used striping tape to get the neat lines but you can just as easily use a striping brush and get the same look. 

Polishes I used:
Essie 3in1 Base
O.P.I. Cuckoo For This Color (2 coats)
Milani Fresh Teal
O.P.I. Barefoot In Barcelona
American Classics Advanced Gelous
Seche Vite

What do you think? Is this your kind of style? The clinic nurse thought it was nice, as did my mum who wanted me to paint her nails (and that is a very rare thing let me tell you!!).