Wednesday, 25 December 2013

It's Christmas!! Candy Cane Nail Art

A super duper quick for you all today. I wasn't going to post today as I worked a night shift and and going to one later tonight but seeing as I couldn't sleep I did some very rushed Candy Cane inspired nails. They are very rough and no where near as neat as I would have liked but I did them and I had to post them. 

Lets take a look...


I still think they look nice even though they look a little hastly put on. I did these straight after a 12 and half hour night shift and didn't put on the topcoat right to the edges which is why the edges look especially roughed up. 

Polish I used:
OPI Nail Envy Maintenance
Sally Hansen Lavender Cloud
Nails Inc Mini Holly Blush Vale
Seche Vite

I also used:
Green Nail Art Striper Pen
1cm Long Striper Nail Art Brush


So that my Christmas mani, even though I have to take it off because I have work later tonight. :( 

Sunday, 22 December 2013

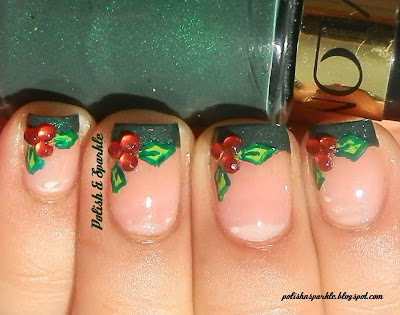
Christmas Nails - Holly French Tips

As promised today I have some more Christmas inspired nail art. These actually turned out better than expected. I was really worried I would have to scrap this idea for fear I would not be able to do the leaves but as it turns out they are not so bad; even if I say so myself. 


This mani is pretty straight forward; tape of the nails and paint a french tip. Then add 3 rhinestones to each nail close to the top corner of the nail. rhinestones save so much time and look much prettier than the standard polish and dotting tool. 
The hardest part of the mani was the leaves. I just drew a diamond with curved sides on either side of the rhiestones and then added some details with a dark green Nail Art Striper Pen which I got off eBay a very long time ago. 

Polishes I used:
OPI Nail Envy Maintanance 
Revlon Emerald City
Sally Hansen Lickety-Split Lime
Seche Vite

I also used:
Red 2mm Rhinestones
Dark Green Nail Art Striper Pen
1x Detailing Nail Art Brush

Saturday, 21 December 2013

Christmas Nails - Rhinestone Christmas Tree


I have been meaning to post this mani for a week now but I have been super busy with work and working nights means my timing is always out and also that I am always tired. I actually wore this mani for 2days before I even took pictures hence why you will see some tip wear.
 I have a few more Christmas nail art posts that I want to get out before its Christmas and with only 4 days left I hope I can get them all posted. 

I decided on doing a ChristmadsTree accent using rhinestones and thought I would try one of my untried polish on the rest of the nails. Nubar Reclaim, what can I say?! Isn't it just beautiful?? It is a green linear holo polish and my pictures do it no justice at all. 


I used a few different rhinestones on this mani, the star shaped one is from a set I brought from Poundland and I am pretty sure it is still available, the rest are 2mm rhinestones which are widely available on eBay. I'm not sure if you can tell in the pictures but I also used gold caviar/microbeads in and between the green rhinestones to look like little baubles. 

This mani would've lasted a long time, and I didn't even use a topcoat, just let the polishes air dry. I would've kept them on longer if I didn't have to remove it for work. 

Polishes I used:
OPI Nail Envy Maintance
Nubar Reclaim
Milani 3D

 I also used:
Nail Glue
2mm Rhinestones in Green and Gold
Gold Caviar/Microbeads 
Star Rhinestone 


Thursday, 12 December 2013

Christmas Nails - Santa and his Little Helpers

It's Decemeber and Christmas is almost here. I don't celebrate Christmas but I couldn't help do some Chistmas inspired nail art. Over the past few year I have always seen other bloggers do christmas inspired nails and have always wanted to do some myself. So this year you will be having more than one Christmas inspired mani. I hope they inspire you and maybe you will chose to do one of these designs for Christmas yourselves for those who celebrate it. 

So for my first Xmas post we have the nail art which I was looking forward to doing the most. Santa and his Little Helpers. I am so pleased with how these turned out. Exactly how I imagined them! 

Lets take a look...


I used black striping tape for the belts on the elf costumes because I was a wuss and didn't wanna get a wobbly thin line and ruin it. Haha! 

Polishes I used:
Duri Rejuvacote 
OPI Jade is the New Black
Barry M Blood Orange
Sally Hansen Lightening
Sally Hansen Raven
Barry M Gold Foil
H&M Matte Topcoat

I also used:
2x fine nail art brush
Dotting tool
Striping tape

The santa costume is pretty easy, a red base with a white line down the middle. Then a black line across for the belt and then yellow square for the buckle. And your done. 
The elf costumes, i started with a half moon green base. Then painted on the red spikes for the collar. Then i used the dotting tool to put on the yellow buttons. Added the black striping tape for the belt and used gold polish for the buckle. And your done. 

I am super proud of these. They are exactly how I imagined and to be honest they are my favourites so far! Granted I have only done these so far but still!! 

Hope you like them and thanks for reading! 


Thursday, 5 December 2013

OPI Black Cherry Chutney

The Great British weather is in full flow this winter. Temperatures have dropped, wind is blowing, I am thankful it hasn't rained/snowed much yet though I fear it won't be long until we lose that luxury as well. 
When such weather is upon us, the bright/neon colours are out, and the darker more muted colours are in. 
I have been feeling vampy colours calling to me this season.
So off I popped to my Helmer and polish stand to find some vampy colours to chose from and realised I don't have many vampy colors at all. Of course now I will be on a "buy all the vampy polishes" shopping spree which no doubt will hurt my pocket but boost my happiness. Haha!

But for today's post I will show you the colour I picked for the vampy mood the weather has brought. I picked OPI Black Cherry Chutney. It is my of my most favourite polishes in my stash, and one I have had a long time.  It is such an understated polish, It is a dark burgundy sometimes even looks close to black in the shade, yet in the sun it sparkles some red.


In the pictures it is directly under hthe light coming from the lamp so you can see the reddish sparkles.


Polishes I used:
Essie 3in1 Base
OPI Black Cherry Chutney

I didnt't use a top coat with this, I just let it air dry. Its glossy enough and dries quick enough. :)

Thanks for reading!!


Monday, 25 November 2013

Doctor Who Nails - Better Late Than Never!!

I'm a little late to the party but I have been waiting to do Doctor Who nails for a very long time and if I don't do them now, I fear I never will. 
Everyone posted their Doctor Who manis on Saturday when 'The Day Of The Doctor' was aired marking the shows 50th anniversary. I was supposed to do my mani then too but like an idiot I forgot it was coming on until an hour before.  Doh! 
But I couldn't let opportunity pass me so I pulled out my brushes and a hell of a lot of polishes and got to work.

I had a few images that I used to inspire me with the nail art so I will show all those first before I show you how I transformed them into a mani. 


And here is how I incorporated them into a manicure. Unfortuately my DSLR ran out of juice and I can't find the charger so these pictures have been taken on my phone except for the last picture which was taken on my DSLR before it died. I hope these are good enough!


I did the Doctor Who official intial/logo on my thumb
Bad Wolf on my index finger, referring to the 1st season and it was also mentioed in Saturdays show. 
The TARDIS on my middle finger.. well a part of it. 
And some Galaxy nail art on my ring and pinky seeing as the Doctor does travel through time and SPACE. 

Polishes I used:
Essie 3in1 Base
Nails Inc Baker Street (Base on all nails)
Sally Hansen Wet Cement (DW logo)
Sally Hansen Lavender Cloud (all white detailing)
Sally Hansen Raven (used on middle finger)
Max Factor Odyssey Blue (one coat on ring and pinky)
OPI Yoga-ta Get This Blue
OPI Grape Wall Of China (sponged on for galaxy)
Sally Hansen Presto Pink (sponged on for galaxy)
Seche Vite

I also used:
3x Fine Detailing Nail Art Brush
Dotting Tool
Cosmetic Sponge

The Galaxy was a bit of a fail, The colours didn't blend I as well as I would've liked but I still think they look pretty great otherwise I'm really happy with how these turned out! I think for next time I may do the full Tardis in the galaxy... who knows when that will be though! 

Thanks for reading!


Sunday, 24 November 2013

Movie Mani : The Hunger Games

My favourite kind of manis are Movie Manis! And today I have one of my favourtie movies/books; The Hunger Games. 
I am a huge fan of both the books and the games. As you can probably tell I love watching movies and I love nail art so more often than not if there is a movie out that I like, I WILL do some related nail art. 

Lets take a look at the nail art and then I will take you through what I did. 


Please excuse my dry cuticle I forgot to moisturise them before I took these pictures. 

I attempted the needle dragging technique for what are supposed to be flames on my ring finger and pinky. I'm not overly happy about them and I definitely need a bit more practice at it but I think they do the job. 
For the middle finger I drew the Mockingjay pin. 
My index finger has the number 12 on it to represent District 12.
I ran out of ideas for the thumb so I just did a glitter gradient that would match with the rest of the mani. 


Polishes I used:
Duri Rejuvacote
Sally Hansen Ceramics - Raven 
No.7 Devils Delight
OPI Y'all Come Back You Hear
Orly Luxe
OPI Glow Up Already!
Seche Vite

I also used:
Needle
Small Detailing Nail Art Brush

So that just about sums up my mani, I hope you like it! If you have done a Hunger Games mani, link it in the comments, I would love to see them!!

Thanks for reading!!

Friday, 15 November 2013

Children In Need - Pudsey Nails


A very quick post today, I am already a little late in posting this so I will have to type super fast and try and make sure I get everything in!!
It is that time of year again when Children In Need and their lovable teddy Pudsey are everywhere encouraging us to give to (as the name suggests) children in need. To show my support for the charity I decided to do some nail art.


Don't mind the air bubbles


So that is what my nails looked like. You can even see my hands covered in some polish from the nail art. I am a very messy person when it comes to nail art. You should see the state of my bed, needless to say my bed sheets have polish all over them!

Polishes I used:
Essie 3in1 base
Sally Hansen Lavender Cloud
Barry M Raspberry
OPI Y'all Come Back You Hear
Sally Hansen Lightening
Sally Hansen Brisk Blue
Black Nail Art Pen
American Classics Gelous
H&M Topcoat

I also used:
Dotting Tool
Fine Nail Art Brush


So those are my Pudsey Nails for Children In Need. I hope you liked them!
Thanks for reading!!


Wednesday, 13 November 2013

Plaid / Tartan Nails

What do you do when you can't sleep? Why nail art of course!! Last night was one of those nights where I couldn't sleep so i decided to spruce up my plain polished nails with some nail art. 
I always wanted to try Tartan/ Plaid nails so why not at 3am in the morning? 


I am not completely satisfied with these but for a first attempt and for 3am in the morning, I'd say its not a pretty bad attempt. I think I will keep practicing til I get it exactly how I want it. 

Polishes I used:
Duri Rejuvacote
Barry M Raspberry
China Glaze Liquid Leather (with added spectraflair)
Black Nail Art Pen
Sally Hansen Lavender Cloud
American Classics Gelous
H&M Matte Topcoat

I also used:
Striping Brush x2
Detailing Brush
Black Triangle Rhinestone
Nail Art Glue

I hope you like them! 

Thanks for reading!!

Friday, 8 November 2013

Wedding OOTD and NOTD Part 2

Today's post is a continuation of yesterdays and covers day 2 of my cousins wedding (the walima). 
On this day I opted for a trail dress, shorter at the front and longer at the back. Unfortunately you will only get a front view as I don't have a picture of the back. 
I love the colour combo on this outfit, the royal blue and the cerise pink go together so well. It is one of my Asian wedding outfits in my possession. 

As weddings go on til late and day 2 was the day after day 1, I really didn't have much time to do any intricate nail art or anything that took too long. I was rushed on time so I opted for a simple french tip manicure but I surprisingly got a lot of compliments on my nails that day.

Onto the outfit and the nails...


Polishes I used:
Duri Rejuvacote
Nails Inc Baker Street
Nails Inc New York 
Seche Vite

I did the french tip free hand but if you hands are shaky and can't free hand you can always make sure the base colour is completely dry then tape off your nails and apply the tip. 

Super easy, super quick and super cute. 

Thanks for reading!!

Thursday, 7 November 2013

Wedding OOTD and NOTD Part 1

So, some of you may recall that I had a few close family weddings whilst I was away from blogging. Today I am going to show you one mani I did on myself for my cousins wedding along with my outfit.

We will start with my outfit. As some of you may have notice I am Pakistani, so for this wedding I wore a sari. I love saris and think they are so elegant so long as they are simple and not too OTT. Some people think you can't wear hijab with saris but I like to think I did an OK job.
But, you can decide...


So that was what I wore, now lets get on to my favourite part of getting dressed up, the nails!!

So I found a polish that was closest to the colour of my sari and used it as a base. I decided to do two accent nails; the thumb and ring finger.
For the accent fingers I decided on a gold half moon, the added some rhinestones and gold micro beads to it to get the final look.
Here is what my nails ended up looking like...


Polishes I used:
Duri Rejuvacote
Milani Fresh Teal
Orly Luxe
Seche Vite

I also used:
Clear Rhinestones (3 different sizes)
Gold Micro Beads
Nail Glue
Dotting Tool (to apply the rhiestones/beads)


So there is my wedding NOTD and OOTD, I hope you ejoyed reading it. As Pakistani weddings have 2 main days I will be uploading the second day (walima) soon too. :)

P.S I am sorry that my picture quality isn't great, as I wasn't blogging the only picture I took were on my phone. Sorry!!

Wednesday, 6 November 2013

Pink and Grey Stripes


Recently I have found that the more simple the nail art the more inclined I am to like it. And stripes are one of my favourites! Since I have started to get back into doing nail art again I have been doing simple manis with colours that I think go together really well. 

I think grey is a colour that goes really well with bright or dark colours, such as; black, cobalt blue, yellow, pink, just to name a few. Today I went for pink and my favourite pink polish is Zoya Moxie. I love how deep the colour is and how it brightens in the sun. Plus it is a perfect one coater and applies like butter. 
Oh how I love creme polishes!!

Here is how the mani turned out...


Polishes I used:
Duri Rejuvacote
Zoya Moxie
Nails Inc Cadagon Palace
Seche Vite

I also used:
A Striping Brush


I love how simple it is. When you have nubbins it isn't always easy to have intricate nail art so simple stuff like stripes, dots and the like look great! 
I also find that darker colours on shorter nails look good. 

Thanks for reading!!

Tuesday, 5 November 2013

Colour Block

I'm back!! Wow I have had a long break from blogging. in fact I have had a long break from doing nails, even my Instagram has had a lack of nail pictures for a while. There has been a number a reasons for that, close family weddings, moving home, lack of internet, lack of inspiration, and sometimes even lack of nails!!
You're probably thinking 'what on earth can she mean by that?!' Well recently I have been have some major chipping and have some very short nubs, like you see in the pictures but most of the time they are worse and that is why I haven't pictured my thumb in these pictures! 

I have finally got my mojo back and have accepted the nub and am trying to work them as best I can. 

This mani is super simple to do and all you need is some tape. I used royal blue, teal and yellow for my colours but you can use any three colors that go well together, they don't even have to be colour block, 3 shades of the same colour would look fabulous as an ombre/gradient look. 

On to the pictures...


The final look reminded me of the summer and in the horrible cold weather we have now i wish we could go back to summer time. Maybe then it would be more appropriate for me to wear this mani out! 

Polishes I used:
Duri Rejuvacote
Revlon Royal
Milani Teal Fresh
Barry M Limeted Edition Yellow
H&M Matte Topcoat. 

I also used:
Tape

The H&M matte topcoat really isn't very matte at all but it still looks great so I ain't complaining. 

So there is my 'Take me back to summer colour block nails' I hope you like them! 

Tuesday, 11 June 2013

Urban Decay Metropolitan & Stamping

Today's post is my favourite polish since I became a ail polish addict going back about 4 years. It was one of the first polishes I brought along with a few other Urban Decay polishes. 
The polish I am showing you today is Urban Decay Metropolitan. It a old polish and as I understand it is discontinued. 

This polish is maroon/burgundy with tiny pink micro glitter in it. 
It applied really well, and could reach opacity in one thick coat but in the pictures I have used 2 coats. The glitter isn't hungry in the pictures I have on one coat of Seche Vite. 
It is more sparkly in real life and it isn't even hard to remove as most glitters are. 

As per usual, I can't ever leave well alone and just had to add some nail art to it. I haven't stamped much lately so I figured I would pull out the old stamping kit and see where it took me. I have to say I'm really happy with the outcome. I used Bundle Monsters BM214 plate for the image and a few bits and bots to bling it up a little. 

lets take a look at the pictures...


Polishes I used:
Duri Rejuvacote
Urban Decay Metropolitan
Barry M Foil Effects Gold

I also used:
Bundle Monster BM214 stamping plate
2mm clear Rhinestones
Silver Micro Beads (caviar beads)

The over all look is really elegant and I can imagine myself wearing something like to a wedding as I reminds me of an outfit I have in my closet. 

Thanks for reading!!

Monday, 20 May 2013

Striped Vintage Rose Nail Art


Today I have some awesome vintage roses nail art to show you.  It was actually inspired by a scarf I have but unfortunately I don’t have a picture.

The roses are the same as the ones I did in my older vintage rose nail art post which you can see HERE. The only difference is that I have added a striped background using striping tape. 

Lets take a look at the picture…


Polishes I used:
Duri Rejuvacote
Essie 3in1 Base
Barry M Matte White
Wet n Wild Ink Well
Barry M Bright Pink
Barry M Blood Orange (detail on roses)
Catrice Rambo No. 5
Sally Hansen Lickety Split Lime
Seche Vite

I also used:
Striping Tape
Dotting Tool
Thin Nail Art Brush

For the striped I first painting the white polish, letting it dry, then adding the striping tape and painting over it with the black polish. When I finished I peeled away the striping tape and there you have perfectly done stripes. 
For the roses I added pink dots the size I wanted the roses and spaced them out how  wanted. I then used a thin small bristle nail art brush to add details in white and red.
 For the leaves I had to mix Rambo No.5 and Lickety Split Lime to achieve the colour I wanted. 

I love how it turned out and actually wore this for 3 days which is shocker as I struggle wear a mani for a full day.

Let me know what you think!
And thanks for reading!!

P.S. apologies for the dry cuticles (lazy day) and not so great lighting... dunno what happened here.

Wednesday, 15 May 2013

Movie Mani: Star Trek

Today I have some nails for Star Trek Into Darkness. I love Star Trek! Well.. ever since Chris Pine has been Captain Kirk *swoon*. Ad when I found out Benedict Cumberbatch would be playing the villain I got even more excited.. if that were even possible! 

I wanted to do a mani inspired by Star Trek for when I went to watch it.. which just happened to be on the day it came out.. and at the first showing (I did tell you I love Star Trek). Unfortunately I didn't get to do a mani for it on the day but when I got home...

 This is what I came up with...


Those of you who have seen the movie(s) won't need me to tell you what I did but for those of you who don't know I attempted the costumes on my fingers, Gold (mustard) for Kirk, Blue for Spock, Red for Scotty and Ahura and Black for Khan. 

I am really pleased with these. They turned out better than I expected. I was supposed to use tape to keep the tips neat but...ain't nobody got time for that! lol.  

Polishes I used:
Duri Rejuvacote
Essie 3in1 Base
Wet n Wild Ink Well
Nails Inc Hampstead Gardens
Nails Inc Denim
Nails Inc Greenwich Market
Barry M Silver Foil
Seche Vite

Thanks for reading!!

Monday, 29 April 2013

Nails Inc Baker Street Polka Dot

Today a quick simple and easy mani using possibly one of my favourite Nails Inc polishes to date; the amazing Baker Street. 

I added a quick white polka dot to it umph it up. Love love love it! 


Polishes I used:
Duri Rejuvacote
Nails Inc Baker Street
Barry M Matte White
Essie Good To Go Topcoat

I also used:
Medium sized dotting tool from my Bundle Monster set. 

Thanks for reading!


Wednesday, 24 April 2013

Side French Tip

Today a quick post of a mani I did a while back when I still had my almond shaped nails. Instead of doing a normal french tip I went along the side. I think it really suits this nail shape.


Polishes I used:
Duri Rejuvacote 
SpaRitual Primative 
No name  Pink Metallic polish
Essie Good To Go Topcoat

Thanks for reading!